I can work on your project.

Find me! Call DAP at 214.350.7678 or email rene@dallasaudiopost.com. Also check out echocollectivefx.com for custom sfx, and tonebenders.net for my podcast.

Thursday, December 29

2011 retrospective

This will be my last post of 2011.  I figured I'd do my list of things that I've learned this year, which will be kind of stream of conciousness, so have fun with all of that.


Things I've learned this year:

  • the sound community is amazing
This is more true than I knew coming into the year.  In this year I've had the great honor of executing a successful kickstarter project, launching a successful sfx website, running a successful blog, and meeting up with dozens of truly gifted and inspiring sound artists.  None of that could be labeled successful without the consistent and selfless moral, emotional and financial backing of this incredible sound community.  That trolley kickstarter got over 50 backers, the sfx website sold more than I could expect in its first 48 hours, and this blog gets hundreds of hits per day - all of which completely humbles and inspires me.  I love you guys, and I gain so much from what you put forth on a personal and professional level.

  • Building an sfx website is hard
In the last few months my coworker Brad and I developed and launched the echo | collective website,  and it was a mammoth effort.  On top of conceiving of and creating all of the sound effects, video, metadata and licensing content, we had to develop an entire web presence inclusive of the logo, web layout, url, wordpress template, photography, website copy, email account, soundcloud acount, vimeo account, twitter account, ecommerce account, and amazon s3 account for file hosting.  Its not rocket science, but its a ton of details to get right.  Going through the process has given me huge respect for the others in the field that do this at a high level.  If it were easy everyone would do it, and it aint easy.

  • Twitter is awesome
I've been on twitter since Aug of 2010, but it was really this year when I started feeling the full potential of what twitter can do.  I found myself constantly interacting with people that I would otherwise not have the opportunity to converse with.  Twitter became my primary news source, my primary update source, and my primary window to the internet as a whole.  Its a pretty beautiful thing that I was very skeptical about before I joined.

  • DPing is hard
A year or two ago I picked up a Canon 7D and set about learning how to shoot with it.  I read voraciously and shot and shot and shot until I started getting results that I became happy with.  After working myself to a spot where I felt that I was consistently getting good results, I took on my first director of photography gig on a short that a few friends and I produced.  I had no idea how in over my head I was.  Its one thing to look at a naturally lit situation and say "ok, I want a shallow depth of field so I'll shoot F2 at 800iso with a neutral density filter here because that's what the light allows for" and its entirely another to have a really good grip asking which F stop and ISO I would like him to light for.  I felt like I was giving him safe answers and maybe not necessarily creative ones.  As much as the photography and recording disciplines are analogous, they are still clearly endeavors that take lifetimes of their own to master, and I feel like it was conceit more than naivety that caused me to think I'd be any good at DPing anything.  In the end I'm very happy with the final results, but still kind of harrowed by the experience.  I may have to do it again.  :)

  • quad is awesome
I've had something of a revelation in the last few weeks after experimenting with some quad recordings.  I really like it.  I realize how niche quad recordings are, and how certain things are just totally useless in quad, but the things that work in quad really work in quad.   I feel like I never want to record ambiances any other way.  Recording things in quad and then placing them in the speakers is a similar experience to when I first recorded something at 96k and pitched it down.  I love it.

  • My line audio CM3s are awesome
I really love these mics.  I'm sure that comes across in this blog, but the sentiment is true.  They sound very expensive, they fit anywhere, they weigh nothing,  and they're not some mainstream mic that everyone is using.  After recording so much stuff with these things I'm very seriously eyeballing that quad LDC that they make as well.

  • very good stealth rigs are difficult to build
I still haven't succeeded in achieving the holy grail of top shelf sound quality coupled with utter stealth transport and proper wind protection, but I feel like I'm getting close.  I think the CM3s will be the key on the mic side because they are ridiculously small (and IMO they sound better than the DPA lavs) but the trick will be mounting them in a hat with proper wind protection and running cables down to a recorder.  I'm convinced it can be done, I just haven't polished this off yet.

  • cross discipline study is huge for developing one's aesthetic
The two steps to making good art are to have a good aesthetic and to have the technical skills to execute work within that aesthetic.  I've known for a while that cross discipline study is important to developing aesthetic, but this year I really had a chance to dive into photography and writing in ways that influence the way that I develop and study sound.  I also became a much closer student of people that design for a living, and have found a huge well of inspiration within them.  

  • the better I get at what I do, the more work it takes to get my work up to par
seriously, it doesn't get easier.  It just gets harder and harder to meet one's own standards.  That feeling I get when I reach them is really nice though.


So there it is.  Here's to a great 2012.

Tuesday, December 27

Christmas Day recordings

Every year for about 6 hours there's a magical time when downtown Dallas sits empty and motionless, and the opportunity for unique recordings presents itself.

In anticipation of this event I asked a question over at social sound design about what to record, and got some good answers.  Top of my list were the church bells at the Cathedral Guadalupe downtown, and some impulse responses of the various spaces downtown.

I've also been itching to test out my quad ambiance rig that I'm going to be using for future ambience sfx library recording.


The rig is two Schoeps CMC6.MK4 mics in the front and two Line Audio CM3s for the rear, each in ORTF.  The mounts are just 3 stereo bars interlocked to one another.  All of that ran into an SD 552, then into a 744t at 24 bit, 96k.

On Christmas morning I headed out at about 7am and set up camp near the church. There was no wind, no traffic, no people.


I knew from the church's website that Spanish mass started at 7:30, so I rolled in this position from 7:20 until about 7:45.  I got some really great birds here, and while there was almost zero traffic anywhere near me, the movement from the highway traveled throughout the city and still made up the majority of the sound of that place.   The bells didn't ring though, so I popped a balloon for an impulse response and considered my next move.

I decided to pack up and try another locale, but first I went into the church and asked about the cathedral bells.  The people inside told me that the bells would ring around 9am, right before the English mass.

Armed with that info, I changed positions to right in front of the cathedral bells and rolled again, this time from 8:45 until about 9:20.

 Plenty of interesting ambience of people walking into the church, but no joy with the bells.  My mics were aimed at the cathedral, so the traffic bys that I caught were interesting in that the perspective shifted the cars from back left to front left as they rode by.  There were still very few civilian vehicles in the city, but the busses were starting to pick up.  It was difficult to find an opportunity to pop a balloon for an IR because I didn't want any of the extra movement that was going on to taint it, but with some patience I found my spot and got my IR.  When I was convinced the bells weren't going to go I packed it up and moved on to another part of downtown.


This locale was great because it was really isloated from both the bus routes and the highway traffic.  It also had some flag jingling potential nearby, but the lack of wind made that pretty irrelevant.  I decided to position the mics for traffic bys nonetheless though, and aimed the rig so that traffic would move by left to right in front of the array.  It was now 9:30 or so and traffic in the city was beginning to pick up.  The balloon IR here was nice and washy, with fewer reflections than I expected in this locale.

After about 20 I picked up and headed across the highway to deep ellum.


Again, I got my IR out of the way early by finding a dead spot in traffic and popping a balloon.  No cars passed in front of my mics in this location, but a few passed on the perpendicular streets to the left and right.  Again, the busses were the primary sources of traffic, and when they were done I was able to go 5 minutes at a time between vehicle sightings.

So in the end I got a few really interesting IRs in quad, I got to test the quad rig out, and I got some uniquely quiet city sounds - all before noon on christmas day.

For the payoff, here are some of the sounds that I got.  First, the IRs in the order presented here in the blog:


Those are the front channel only, but they're pretty illustrative of what I was able to get.  Not perfect, but not ruined either.

Next are the front and rear wide ambiances from the first photo.  If you want to hear them in quad, then download them, line them up your DAW, and route appropriately.  I boosted gain here by 10db from the level actually recorded for internet purposes, but no other processing has been done.


Finally some traffic that I caught at the main street location. This is a much longer clip with some really interesting things going on.


Despite all of the action going on in these clips, I was easily able to get a solid 5 minutes of non-movement sounds from each of the locales I recorded.  It really just sounds like the traffic wash in the background of the clips, but I have tons of it now.

enjoy!

Friday, December 16

the launch of echo | collective


After several months of development my coworker Brad and I have finally unleashed echocollectivefx.com on the world.

We decided to enter what is a pretty crowded indie sfx market, and we didn't make that decision lightly.  There are many very very good libraries and indie guys out there, and our goal from the outset has been to rise up to the level of the guys that are doing this the right way.

It took a fair amount of learning on different platforms to pull it all together.  This was the first wordpress site that I've ever built, so there was a learning curve there.  This was also the first site I've built with online purchases, so I had to learn the ins and outs of that whole paradigm. 

On top of that there was all of the content creation, documentation, marketing materials and file hosting.  To further complicate things, we decided to launch with 5 full products and 5 freebies.  Oh yeah, and our full versions had dozens of fully fleshed out Kontakt instruments as well.  There is tons of room for human error in this process, and everything required double and triple checking to avoid stupid mistakes. 


We actually ended up launching the site a day behind our target because I had to troubleshoot a download issue with our flagship product, the forgotten zither, and my website host was undergoing a ddos attack to its severs while I was trying to solve the problem.  This caused me a lot of stress because I really hated missing a deadline (even if no one knew about it).   I was determined to get everything up, tested, and triple checked before announcing the site to the world though, so I swallowed hard and pushed the launch back until I could get every product re-hosted and double check all of the downloads again. 

-

Despite all of the newness and craziness we had an incredibly successful launch.  Designing Sound did us a tremendous service by posting a feature with a Q and A, and many of my twitter friends supported the launch with compliments and retweets.  We also got plenty of love from the soundcloud digital music crowd that Brad travels in.  Also the site didn't crash and all of the links did what they were supposed to.

An event like this fills me with gratitude for my lot in life, my friends and the support of the online audio community.  I'd like to take a moment and specifically thank a few people who influenced the success of the site and the launch:

Michael Raphael - Michael is one of those top-shelf recordists who has always lent me his ear and lets me bounce all kinds of crazy ideas off of him.  This thing would not have launched as well as it did without his input.  He's been eternally supportive of the ideas and endeavors we're putting out.  His stuff rocks, go buy it.

Tim Prebble - Tim is the guy that constantly comes up with interesting and useful things to record and put out there.  His is the the highest level of stuff in the sfx market, and his advice and mentoring have been invaluable.  He's also the gold standard with regards to promo vids.

Miguel Isaza - Miguel runs designingsound.org, which has become the daily must-read site for sound designers of all stripes.  His support both with this launch and other things has been invaluable, and his platform is unmatched.

Varun Nair - Varun is an editor at designing sound, and did me the tremendous service of testing our Kontakt instruments out in the wild.  He's got other stuff brewing as well....

Paul Virostek - Paul has been posting a very good series on launching a library which I've been reading and re-reading voraciously.  This guy knows his stuff, and he's incredibly generous to put that stuff out there for guys like me to learn from.

Samuel Justice - Sam bought the first library.  This makes Sam the man.

I'd also like to thank all of the twitter peeps who retweeted the launch and the good good people who actually jumped onto the site and bought something.  I'm filled with gratitude.

Sunday, November 27

an unconventional train recording


A while back I scouted out a remote train recording location along a track that I knew to be under pretty regular use by the freight lines that run through downtown.  Its amazing sonically, but not in the nicest part of town so I have to choose my times of day carefully since I don't want to be out there after dark.

The unique thing about this location is the fact that its right over the trinity river basin and has perfect access to the underside of the train bridge.  This presented a golden opportunity to both record a train by from a unique perspective (underneath) and to plant some contact mics on the rails and see what those things would hear.  I also wanted to do a very wide perspective since so many train bys that I hear and record lately are of the very closeup variety.

As I was still getting set up a train ran up over me and surprised me.  I panicked a bit, rolled on the audio, fretted about my contact mics not being set up, grabbed my handheld recorder, and looked for the video button on my phone.  The rest is in the vid below.


you'll notice that about halfway through I had to flip the video because I was holding my phone upside down, which made the train go in the wrong direction on the vid. good times.

 Here's a more detailed look at the setup:
Contact Mics

Mics under rails

Mics ORTF aimed up in the blimp


and here are the sounds from up close: The contact mics yielded surprisingly little sound and none of it really ended up being very interesting. On my next run I may try them on the wood rail ties. In all it was a pretty good shoot despite that, but I certainly feel as though I can get more and better sounds if I keep coming out.

As a side note, I will be posting the high res files of both the close and wide perspectives on two train passes to The Sound Collector's Club for download.  All you need to do is sign up and post a train recording of your own to get them.

Join in the fun!

Thursday, November 17

stealth rig prototype

A few days ago I posted a few pix of the stealth rig I'm developing to the twitter and got some interested responses, so I'll spell out what I'm thinking in a little more detail here.


I'm actually surprised there's not a commercially available hyper portable rig with suspension and wind protection available out on the market.  Here are the needs I'm trying to address:
  • inconspicuousness - I'd like to be able to take this out into a crowd and not get strange looks.  I'd also like it to not look like a bomb.
  • wind protection - very important to be able to take this out into low to moderate wind conditions and get usable recordings
  • low handling noise - I'd like the rig to be well suspended enough that I can carry it while walking without audible bumps
  • all in one - I want the entire rig to be together - recorder, cables, shockmount and mics in one package.
Why not just roll that D50 out there in those situations?  In many cases I do.  The D50 meets all of the above criteria and does them beautifully.  (yes, I can totally walk around with it and not get handling noise)

But with all of that said when I can I'd like to run better mics.  The D50s mics are just fine for most things but I really do like my CM3s quite a bit more, and if I can create the option to use them in stealth situations then I would very much like to, so I've built this:


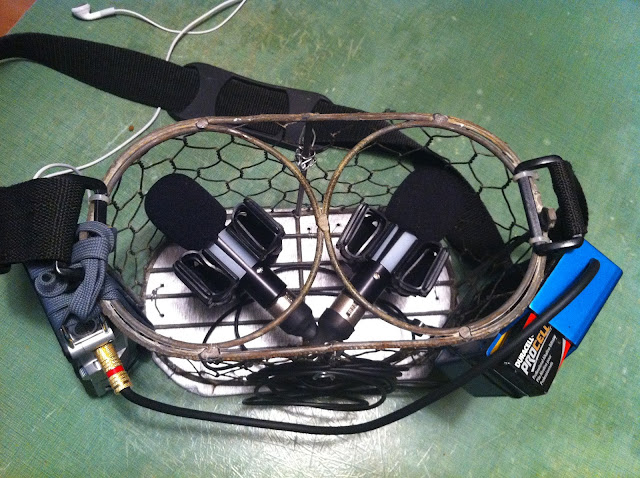
So here are the basic components:

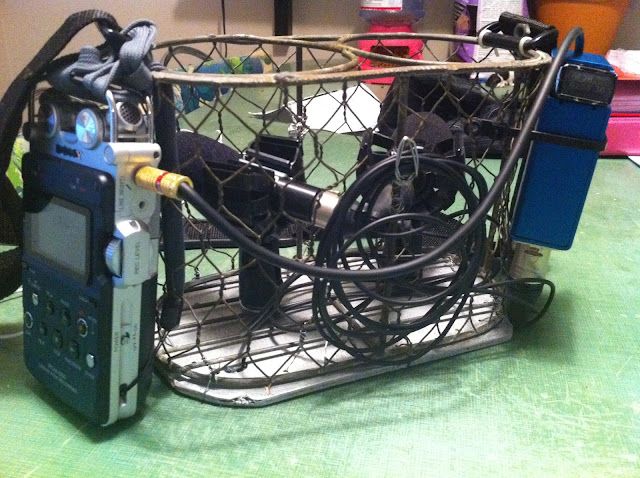
-The cage:  In this case I'm using a wire wine holder I got at Hobby Lobby.  I stripped off some of the extraneous decorative wood and other bits, and was left with a sturdy steel cage and a chickenwire surround.

- The mounts: The shockmounts were part of the CM3 package that I bought from No Hype Audio.  They're very nice, compact, and they mount into the wooden bottom that I've attached to the bottom of the cage.

- The cables:  I was looking to make the most low-pro cables I could, so I jumped on Markertek and found this mogami w2697 lav mic cable (cheap), and a pair of Neutrick NM3FXI female XLRs that are basically half-length.  I got some heat shrink to work as protection and strain relief.  The upside to this type of cabling is that its super low pro and flexible.  The downside is that it's not nearly as rf-shielded as a thicker and less flexible cable.  I may try to build a pair of short right angle cables in the future.

- The recorders: That's a Deneke PS-2 on the right providing XLR in and phantom power (just tie wrapped on for now) and the PCM D50 on the left.

-the wind protection - still in testing.  I'm in the process of testing out various covers and layouts that would work here.  One idea I had was to take a piece of cloth and attach it to the bottom, then kind of flap it over and cover the entire device from front to back.  This leaves access along the sides (through the folds of the cloth) to the recording devices.  Another idea would be a basic pillow-case type cover that just plops over the top and is measured to the right length.  recorder access would be the issue to get addressed when fabricating that way.  I'm also testing which fabrics give me the best wind protection/transparency ratio.  I was pretty surprised to find out how much high end the rode deadcat was knocking down, so I still have much to learn there.

so that's it.  The rig works fine, it's kind of lunchboxy when I use the flannel cover, and it sounds great.

comment with any other questions you may have.

Quickie fieldrecording tip - tapslating

Over my last several larger scale audio shoots I've made and then subsequently ignored my input lists in lieu of a different method - tap slating.

Tap slating is what it sounds like.  You set all of the mics up about where you want them to go, then run cables and plug them into the recorder.  Hit record, and walk around to each mic.  Tap the mic and slate.

*tap tap* "that's the schoeps CMC6 MK4 on a shockmount aimed at the exhaust"
*tap tap* "this is a 421 passenger side axle aimed at the tire"
*tap tap* "that's an NT5 in the engine compartment aimed at the heads"
*tap tap* "and this is a CM3 next to the exhaust aiming out behind it"


etc.

With everything slated, set levels and you're off.


The beauty of this is that you don't have to stress about which mic is plugged into which channel at the time you're setting up.  Just run the all the cables at once, plug them all in and you're good.  It also helps on the flexibility/spontaneity side because you don't feel as tied to your preconceived ideas about where you're putting which mic.  Spend the moment setting up and listening as opposed to writing stuff down, then tap slate and start rolling.

In post you'll see the tap slates a mile away, and you'll appreciate the better descriptions that you'll dictate to yourself.


Sunday, October 23

The Texas State Fair

Last weekend my wife and I took a trip to the Texas State Fair.

I did a little research beforehand, and after finding out that you can bring everything coolers of food to concealed handguns into the fair, I figured that a low pro recording rig wouldn't cause much of a fuss.  Sure enough, I got in without much of a fuss despite looking like I was carrying a weird plastic tube weapon.


The thing about the sound of the state fair is that there is music pumping and blaring everywhere and in almost every building, which doesn't leave much room for commercially usable recordings.  After about half a day I came back with a few things, but not really a whole lot of unique and distinct sounding things.

The midway was probably the most interesting sounding space, since there were rows of miked up carnival barkers calling races and hawking games to passersby.


Overall we had a great time despite not getting a whole ton recorded.  I also got that stylin hat. 


Sunday, October 16

A recording of Occupy Dallas

I'll preface this by saying that this is not a political blog, its an audio one.  This post is about the unique audio I was able to record yesterday.


Occupy dallas march

I'm fascinated with how crowds of people sound, and while I'm always recording sports crowds I find protest and riot crowds to be the most unique and intriguing.  There's an energy there that you can't fake, and I was certainly trolling around for some recordings after the Madison protests and the Vancouver riots happened - but to no avail.

Yesterday I was sitting around deciding whether to go record the Texas State Fair or to head downtown and record Occupy Dallas - a protest group that's formed locally in solidarity with Occupy Wallstreet.

After checking their blog, I found that Occupy Dallas was planning a march on Goldman Sachs and I decided that I'd opt for that because I didn't know how many big opportunities I would have to record a good protest locally and in a fairly safe manner.

After a little thought I decided against going full stealth for this one.  I figured that there would be tons of media out there, both from within the protest and externally so I'd probably be fine with a proper mic pair up in the air.  I loaded up my low profile rig that consists of a pair of Line Audio CM3s in ORTF inside of a Rode blimp recorded into a Sony PCM D50 - all packed into a messenger bag.  I went with a gray shirt and blue jeans so as to not draw too much extra attention to myself though.  No hat, no sunglasses.

The blog said that the march was scheduled for 1pm, and by the time I was packed and tested it was already 1:45ish, so instead of heading to the OD headquarters at city hall I went straight to the Goldman offices in uptown.  Sure enough, there they were with a pretty large presence and the police holding a perimeter around them.  I parked about a block up and became painfully aware of how much like a bomb my audio rig still looks.  I must change that in the future.

After a few speeches and chants the event seemed wrapped up and the crowd started its march back downtown to city hall.

I made the decision that I hadn't recorded enough material yet and there was too much gold just walking away from me, so I loaded up and started walking with the group, having no idea what the route was or how far they would be headed.  We ended up heading about 3 miles south and the march took about 30 minutes, with chants and cheers going on the whole way.  It was a very parade like vibe, both serious and light hearted.  

It was also a pure clinic on populist chants and callbacks.  One of the leaders had them all loaded up and ready to go, and the group was right on with the responses.


There were times during the march when the group was spread out enough that it had overlapping chants going on at the front vs the back of the line.  At other times the group was more bunched up and had the effect of sounding larger and more cohesive.  Occasionally passing motorists would honk their horns and get cheers from the group.

By far the coolest audio event of the day was when the crowd marched under an interstate overpass.  All of the sudden there was this incredible city reverb washing over the entire group.  Everyone perceived it affected the tempo and intensity of the chants.  I have a byte of that at the end of the soundcloud link above, and I have a little iphone video as well.  You can hear how much it dries up once the group comes out from under the bridge.


Once everyone reached the base camp at city hall downtown everyone kind of settled in and took a break.  I bought some ice cream from a palatero down there and after resting for a moment I walked back to my car along the same route as the march and listened to the recordings the whole way back.

In all I got about 45 minutes of great stuff.  very little editing needed, and a heck of a good recording day.  I'll save the state fair for Monday.  :)

Wednesday, October 12

A semi stealth recording with my new CM3s

A month or so ago I stumbled upon a thread in the gearslutz forum where people were hyping a new mic called the CM3 that comes out of Sweden from a company named Line Audio.

After much discussion some guys started putting up sample recordings of the mics in shootouts against the Schoeps CMC6 mk4 mics, and I was so impressed I jumped and bought a couple.

The company I purchased from is called No Hype Audio, and they're really just that.  Jean Pol was incredibly helpful and responsive, and he got me the mics with shockmounts within a week.

I ran my own shootouts vs the schoeps CMC6/MK4, NT5, and SM81s and came away incredibly impressed. I'll have a more detailed blog post with the shootout later on.

After a few weeks of owning these little things I can certainly say that I don't feel like owning two is enough of them - I want more.   I'm lobbying Roger Jönsson, the manufacturer, to put out a hypercardioid and a figure 8 model.  :)

 Right out of the box, the striking thing about these mics is just how small and light they are.  They're literally shorter in length than a standard business card, and they weigh absolutely nothing.

They're the exact diameter of an NT5, and have a fairly wide cardioid pattern.  Given the size I figured I could mount them in a kind of ORTF setup inside of my Rode blimp and take them on a couple of test runs.

Holding them in your hand, its almost hard to take them seriously, but oh man they deliver on the sonic front.

Mounting is shown here, and the mics fit in this configuration effortlessly.


With everything loaded up I packed the rig into a messenger bag and left the blimp just kind of hanging over the top.  It still kind of looks like a pipe bomb up there, but I decided to risk it and jump onto the local commuter DART train for a few rides and other things.  I used my ipod earbuds for monitoring and jumped on.

I was able to actually get on the train while rolling and ride from stop to stop with no issues whatsoever.  I had a guy ask me for some change, but no one looked twice at the giant rocket launcher I carried around with me, which was very encouraging.

After a few trips up and down I hopped out and got some ins, outs, and bys as well.

The results speak for themselves - excellent detail, great imaging and a way better than "useable" recording of the entire commuter train experience.

Train Bys

Train in/stop/out with annc (standing with the bag slung over my shoulder)


All in all I'm very impressed with the new mics and I'm working hard on a more stealth-like rig in the near future.


Sunday, October 9

Kickstarter compilation thread

I feel like it makes sense to compile all of my Kickstarter posts into one master thread, so here they are:

part 1 - overview
part 2 - research and setup
part 3 - hard decisions
part 4 - project launch
part 5 - the interim
part 6 - recording, editing, metadata
part 7 - final numbers and thoughts

feel free to leave any thoughts or stories about kickstarter or the trolley sounds here.

thanks!

Sunday, October 2

Kickstarter Pt 7 - Final Numbers and Thoughts

Well I'm finally at the end of this kickstarter road.  I've put a fair amount of energy into recapping the whole process, so hopefully someone out there has learned enough to inform a decision one way or the other on the process.

I initially set a $325 goal and I ended up raising $1725 before expenses from the backers of the project, which was a massive success.  I attribute that to three factors:
  1. Newness - not a lot of sound effects library kickstarters out there, and I think the community was really working out its viability as a platform and wanted to participate.  This effect could wear off in the future.
  2. Subject matter - not everyone has access to antique streetcars, and limited access to subjects tends to increase their value in the marketplace.  If I had decided to record car bys I probably wouldn't have met my funding goal.
  3. Exclusivity - the only way to get the library was to back the kickstarter, so some people who may have otherwise waited for a specific project instead had a strong incentive to go ahead and back now for fear of missing out and needing the sounds later.
-----------
Overall, expenses were as follows:

Kickstarter $83 (this ended up being slightly less than 5%)
Amazon $76.64 (ditto) 
Trolley car rentals $350 (increased because I chartered 2 cars instead of 1)
Equipment rentals $300 (increased because I wanted more coverage)
motorman tip $40
misc supplies $50

total expenses - $899.64

net profit $1725 - 899.64 = $825.36

Hours:  I'll bet that I can easily find 80 hours of work involved in the whole process when you include project setup and research, prepro and scoutiting, recording and editing, and back end administration.  

Good thing I love this stuff.

----------

As you can see by the profit/hours ratio it would be pretty difficult to make a middle class living doing nothing but kickstarters even if they were all wildly successful - which is no guarantee.  The main reasons for this are the high percentages that KS and Amazon take coupled with the user liability for all expenses. 

There's also the very strange social effect of that huge number up there on the home page of the project showing the world exactly how much has been pledged.  I found that everyone remotely interested had an opinion on how much was raised, and once I significantly passed my goal everyone around me was looking for ways to spend the money.  I also imagine that my project's backers felt a bit of extra ownership of that number once it reached so far above its goal, which is partly why I chartered the extra streetcar and did the extra recording and editing.

Most businesses are not this open with their books, which illustrates something very important - Kickstarter is not a business model, it's a vehicle for getting projects done.  I couldn't have gotten both of those streetcars chartered without the help of the Kickstarter platform and my backers, and in the end that was my primary goal.  The extra money was secondary to the primary goal of getting those cars recorded.  

In that respect the kickstarter platform came through in spades.  

Kickstarter gave me a clean look, handled all media hosting, handled all payment transactions, and made communication with current and prospective backers incredibly easy and professional looking.  

The customer support and interface were both very good and at the end of the day all of the money showed up in my account, which is not to be taken for granted.  

---------

So when should you and when should you not do a kickstarter?

In my opinion, you should seriously consider a kickstarter if your project meets the following criteria:
  • It genuinely requires funds to get off the ground
    • As outlined above, doing kickstarters purely for the money is kind of paddling upstream.  Use KS as a tool when money isn't the goal, but getting a project done is.
  • It's something that others would genuinely want to back and receive rewards from.
    • Doing KS projects for items that are either ubiquitous or useless is not setting yourself up for success.  Have something specific and make sure its interesting and useful to the community at large.
  • It's been vetted, cleared and is ready to go.
    • Don't launch a KS project for something that you're not positive that you can deliver on.  It would be the worst thing in the world to launch a KS, meet your goal, and then have to explain to your backers that you didn't have access to that cool sounding thing after all.
  • It's something that you're willing to invest extra hours in to administer
    • Doing a kickstarter requires a heavier investment in time than just the recording and editing that come with traditional sound effects projects.  Setting up the initial pitch, maintaining the project site, doing updates and corresponding with backers all take time.
If you already own an SFX site and have access to cheaper money than the 10% KS and Amazon charge then you may have a hard time justifying a KS financially.  If you don't, but have a one-off project that others may have interest in though, I'd highly recommend it.

thanks for reading.

Thursday, September 29

the kickstarter experience pt 6 - recording, editorial, metadata


Recording day was pretty stressful, but also all kinds of fun.

As soon as the regular work day wound down, I grabbed a coworker and our intern and we headed to the trolley barn.  

I posted some pretty heavy updates on the kickstarter site about the whole experience with photos and vids, so check that out here.

The long and the short of it was that I got some unexpectedly cool stuff and lost some mics unexpectedly due to various issues, as is to be expected in big complex time crunched recordings.

If I had it to do over again I'd have put the schoeps in the blimp outside of the car (although that blimp did have some near misses in traffic) and I would have not put the 421 on the controller because its recording was completely destroyed with RF.

---- 

Once everything was back in the studio I spent a few weeks editing.  Details and pics here.

My process was to put all of the files into a protools session and line them up chronologically.  This gave me about 7 different perspectives of 2 separate 30 minute trolley runs.  I did whatever processing was necessary per track (mostly gain matching and a little eq) and then came up with a composite mix to deliver in addition to the split out onboard tracks.

I then went through and listened to each individual track soloed out and edited out any craziness I came upon.  This process took for damn ever.

With the entirety of the tracks placed, processed and edited I listened through again and divided each set vertically by event.  In this way the files I delivered would be sure to line up to one another in post, so that an end user could potentially create a new mix from the individual mics that would line up quickly and easily.  I then used a quickkey script to rename the individual regions.  This also took for damn ever.

------------

With everything edited and exported I then went into metadata mode. Details and pics available here.

Soundminer is really the best tool for metadata editing, as it can do batch changes with ease and will embed the metadata into the bwav header.  I used my standard process of copying the filenames into the description field and then using batch functions to add more data in groups.  I then copied the descriptions down to the bwav description fields, added the photos and embedded all of the metadata.  This took time, but not as much as the editorial.

With all metadata embedded I triple checked everything in the protools workspace and in itunes.  

------

Last step was to export the different versions into different folders and set up different logins on our ftp for the different backer levels.  Then post the files, download them from home as a test run, open the downloads and (finally!) distribute the links to the backers.

The entire post process is what really takes a good amount of time and is a primary reason that I feel one would have a heck of hard time raising any serious money doing even very successful kickstarters.  

Thursday, September 15

the kickstarter experience pt 5 - the interim


As noted before, I was fortunate enough to fund my goal within 5 hours of the project launching. Soon after that my project was posted on designingsound.org and before I knew it I had more than doubled my goal.
In addition to kind of blowing my mind, this show of support had the side effect of increasing the scope of my project.

I immediately booked two trolleys for a date a couple of weeks out. This effectively doubled my workload, expenses, edit time needs, and output to my backers but I was happy to do it in return for the amazing support I had received.

I made the downpayment on the trolleys out of my own money, and convinced my company, Dallas Audio Post, to front the costs of the trains so that I could get to recording as early as possible.

With money fronted I made it my mission to spend the next few weeks doing as much scouting and prep as I could, given the time constraints I knew I'd be under on the day of the record. I began spending some time at the trolley barn and getting to know the people I'd be working with. I met Dean, my motorman as well as a couple of volunteers that really knew what they were doing.


I was able to shoot some preliminary videos and really get a gameplan mapped out, which included things like finding mounting points, interesting sounding parts, and just generally befriending the train people.

During the two weeks prior to the shoot I was probably at the trolley barn 6 or 8 times.

I was pretty diligent to document stuff and post vids and updates to my kickstarter backers, which the website makes into a pretty simple affair.

The KS update page allows inclusion of audio, video and pictures and handles both emailing the update both to backers and posting it to the main kickstarter page. Uploaded media basically works as an attachment, meaning tha tyou can't really post it in-line the way that you would a blog post, and it insists on re-encoding everything.

Those minor things aside, its a very well laid out update mechanism that makes it easy to keep your backers up to date.


Recording day was coming down the road quickly, and making the best of my interim time ended up being incredibly important.

Saturday, September 10

the kickstarter experience pt 4 - the launch

After all of the prepro, scouting, dealmaking and decisionmaking it was finally time to launch the project.

Kickstarter makes a big deal out of how important it is to produce a video. They give you stats that show how many projects have videos and what the success rate of video vs non video projects have, which is pretty stark, thought that’s all that I remember about it.

The point is, make a video.

Most kickstarter vids are people talking into camera and describing who they are and what they plan to do. I actually cut one of those and then really hated it, so I went more towards what the sound design community has been doing and decided to shoot a little footage and sound of what it was that I planned on recording. I used my iphone and my PCM d50, holding the two together and just getting on the train for a ride. I figured that would be more instructive to potential backers and would have the added benefit for all of keeping me off camera.

I used text on screen to do the talking for me, and let the video just be an immersive experience into what the trolley car sounds like. In the end, I loved the result and felt it was pretty effective.


I’ll note here that KS re-encodes the video before posting, so you can see that some of my text ended up coming off a little lower-res than I would have liked. Just keep that in mind with text on screen.

writing your “about this project” page

In my case, I treated my about this project page basically as a blog post. I put some history up there about the trains, posted a sound clip that I had recorded while scouting, described the agreement that I already had in place with MATA, and stated my goals and needs for the project.

Pretty straightforward, but for those not comfortable with writing such things you may want to get a trusted set of eyes to look over it all before launching. You can edit this page after the fact, but when you launch the clock starts and you’ll want to be directing all of your KS energy towards the awareness push at that point.

I left descriptions of who I am and why I’d be any good at recording this stuff to my profile page, which is also right there on the project home page.

FAQs

I found FAQs to be very helpful on other kickstarters, and I figured the biggest question people would ask is “how can I use the sounds you’ll deliver?” I knew people that would be most willing to pay for sounds will want max licensing freedom, so instead of creative commons I went for the more useful full royalty free usage common with purchased sfx libraries.

I also described my gear, metadata methods, and reiterated the exclusivity of the library.

The FAQ format is pretty good for bullet pointing things that backers will want to know before committing the cash, and the KS software does a great job of formatting.

Launch and push

With everything written it was time to launch and push. I triple checked the things I couldn’t change (deadline, funding goal, rewards and reward levels) and then published.

I had emailed Miguel over at designingsound.org prior to my launch to see if he would be amenable to putting my project up on his page. He was into it, so I sent him a link. I also sent out an email to a small number of individuals in my contacts list that I figured would be interested.

I posted to twitter and facebook as well. (google+ hadn't been launched yet)

In each of these pushes I explicitly asked for the two things I wanted - please back this and please share (or retweet) this.

Really that was it. When I launched I was shocked at how quickly people picked it up and shared it. I think to some degree it was the novelty of the thing, but regardless it was a pretty humbling experience.

I fully funded in 5 hours, and then after that the designingsound post went up and the funding really took off.

Monday, September 5

the kickstarter experience pt 3 - hard decisions

with all of the groundwork laid it’s time to make the hard decisions.

There are four things that you have to set in order to launch a kickstarter, and once you set those four things you can’t change them, so you really have to do your homework before committing to those numbers.

Lets start with the first and most difficult.

---your financial goal---

Setting a target goal is one of the trickiest aspects of launching a kickstarter. Set the goal too low and you may end up reaching into your own pocket in order to deliver on your promises to your backers. Set the goal too high and you risk not getting funded.

Here’s how I approached it:

First, calculate your expenses. For the purposes of this project I had a charter fee of $150, a planned gratuity of $40 for my motorman, and a small budget of $100 or so for gear rental, food/drink, and other minor expenses. I knew that delivery of the final assets wouldn’t cost me anything, but if you’re planning on delivering anything to your backers that costs any money to produce, be sure to factor that in to your expenses.

My total added up to $290.

Next I had to factor in the fees that both KS and Amazon payments were going to charge. Kickstarter takes a flat 5%, and Amazon takes somewhere between 3% and 5%. I decided to just assume that 10% was coming off the top. The proper math for this is to take your expenses (E) and to DIVIDE that number by 0.9.

To reiterate, your financial goal should equal E ÷ (0.9)

In my case 290/(0.9) = $322.22 I rounded the number to $325 and called it a day. $325 * 0.9 = $292.50, so I knew if I hit my goal I was going to be able to execute the project.

Time to define the next part of the project.

---your rewards---

I figured this would be pretty simple, and for many sfx style recordings it should be. I planned to deliver a fully fleshed out library of trolley sounds at various resolutions for the various backer levels. I would include photos and metadata.

Fortunately, much of the technology and indie sfx market has settled in on what are the general standards.

In my case I went with:
256k mp3s
44k 16 bit wav
24 bit 96k wav
and 24 bit 96k with broken out mic layers for the top tier.

The other thing that I offered was complete exclusivity. This meant that I would not put these sounds up for sale in the future, and you could only get access to them if you backed the project. I went with the total exclusivity route because I wanted to do everything I could to make sure the project got funded. In the future I’d probably go to some form of limited exclusivity given the results of this first effort.

The thing to remember is that once these specific rewards are set they cannot be changed, so consider carefully exactly what you want to give away and how you want to do it.

Also, its important to consider delivery costs. In my case I had access to an ftp that I was able to set unique passwords for, but in some cases you may want to budget for a delivery service or medium.

Rewards were set, another big decision in front of me.

---your backer levels---

Again, in this case I’m fortunate in that the indie sfx community has basically put up some general pricing standards that backers would be familiar with.

I swam around it a bit and came up with the following pricing:

$1 for thanks
$5 for the mp3s
$15 for the 44k wavs
$25 for the 96k wavs
$40 for the 96k wavs with broken out individual mics
$120 for the 96k wav with borken out mics and a personal meetup

I assumed that everyone would gravitate towards one or two levels, so I calculated how many backers in each level it would take to fund my goal on its own:

65 $5 backers or
21 $15 backers or
13 $25 backers or
9 $40 backers or
3 $120 backers

Looking it over I felt that I could pretty safely assume 9 $40 backers, or at least 5 or 6 and then a few $25 backers to make the diff, so my pricing ended up looking pretty doable.

I also honestly thought that the $5 level was the biggest bargain and could possibly skew my numbers too far down, but the network of people that got the message on this project skewed much more towards the sound designer crowd, so that helped me out tremendously.

with my goal, rewards and levels set I had one more critical decision to make.

---your deadline---

In kickstarter, deadlines are less defined by dates than by time periods. you can go anywhere from 1 to 60 days out.

One important thing to keep in mind when setting a deadline is that there is a time-lag in between the deadline passing and the funds from a successful kickstarter hitting your operational account.

Kickstarter does not start transferring you money the moment you meet your goal. In fact, it does not charge your backer’s credit cards until the deadline date that you set, so if you hit your goal early (as I did) you still have to wait until your deadline passes before payment processing begins.

Kickstarter advises that it can take up to 14 days to process all of the payments and transfer them to your amazon business account. You then have to account for the 3-5 business days it takes to move funds from amazon into your operational account. This all happens AFTER your projects deadline passes.

That means if I set a deadline that’s 30 days out, it could be as many as 45 days before I can gain access to the backer’s funding needed to execute the project

In my case, 80% of the backers funds transferred into my amazon account on the day of my deadline and the transfer out to my operational account also only took one day, so I got my funds very quickly compared to their predictions, but I’d still approach timing with regards to seeing the funding with extreme caution.

The other complicating factor there is time frame with regards to booking the trains. I couldn’t confirm a date with them until I had reached my funding goal, and they required a two week lead time. Fortunately I reached my goal quickly and was able to book the train pretty much right away, but if I had been in a huge funding push to reach the goal at the end it would have added two weeks to my turnaround time.

All of this is to say that Kickstarter is in no way an instant gratification kind of thing for you or for your backers. It’s a process, and that process takes days and weeks to get done just from pure logistics, so be sure that your backers and vendors are informed and updated as to what’s going on behind the scenes.

With all of that under consideration I chose a deadline date of 21 days out, mainly to give potential backers a chance to get a paycheck in set some $ for the project aside. Even though I funded much more quickly than that I’m pretty happy with the total time I ended up choosing.

---final thoughts---

once these decisions are made they are no longer in your control. It's as though you set them into a boat and floated them out to sea, and now you have to chase them all down.

This means you really have to do your homework on the front end with regards to monetary needs, timeframe commitments, and vendor bookings. It also means constant communication with both your vendors and backers.

If you mess these decisions up it could be the difference between a successful project and a failure, so triple check your work and then send it off!

Tuesday, August 30

The Kickstarter Experience Pt 2 - Research and Setup

kickstarter part 2 - research and setup


Once I had made up my mind that I wanted to do the trolley thing as a kickstarter project, I knew I had to do my homework.

First on the list was to head back out to the trolleys and ride some more. I brought the trusty ole PCM D50 and made some test runs, and jumped on several of the different cars. After a few rides I had my favorites and I looked up the MATA contact info.

I needed to get pricing and permission from MATA, the trolley transit authority. I contacted their business department and after a few rounds of email and phone tag we were able to discuss and negotiate the whole deal.

MATA actually does trolley charters as a primary business function and they were more than happy to give me a good rate on the cars and to agree to my ideas of mic placement. After some discussion we decided on Rosie and on Matilda as my target cars. Those two were some of the most distinctive sounding, and had the added benefit of being the smallest and largest cars in the fleet respectively, so I knew I could get a very different set of sounds from each. I set a tentative date with them and began my kickstarter research in earnest.

Obviously anyone considering a kickstarter project should spend some time in the FAQs and Kickstarter School sections of the website.

Kickstarter really does have a great reserve of getting started info and tips that will lead to success. Kickstarter’s resources (and in fact all of their communications) are very clear and well-written. At no point did I ever feel like i was reading legalese in the process, which is a heck of an achievement IMO.

An example is the language in the guidelines page:


Project Guidelines
Kickstarter is a funding platform focused on a broad spectrum of creative projects. The guidelines below articulate our mission and focus. Please note that any project that violates these guidelines will be declined or removed. Please contact us if you have any questions.

Projects. Projects. Projects. Kickstarter is for the funding of projects – albums, films, specific works – that have clearly defined goals and expectations.

Projects with a creative purpose. Kickstarter can be used to fund projects from the creative fields of Art, Comics, Dance, Design, Fashion, Film, Food, Games, Music, Photography, Publishing, Technology, and Theater. We currently only support projects from these categories.

No charity or cause funding. Examples of prohibited use include raising money for the Red Cross, funding an awareness campaign, funding a scholarship, or donating a portion of funds raised on Kickstarter to a charity or cause.
No "fund my life" projects. Examples include projects to pay tuition or bills, go on vacation, or buy a new camera.

Rewards, not financial incentives. The Kickstarter economy is based on the offering of rewards – copies of the work, limited editions, fun experiences. Offering financial incentives, such as ownership, financial returns (for example, a share of profits), or repayment (loans) is prohibited.

Community Guidelines

We rely on respectful interactions to ensure that Kickstarter is a friendly place. Please follow the rules below.
Spread the word but don't spam. Spam includes sending unsolicited @ messages to people on Twitter. This makes everyone on Kickstarter look bad. Don't do it.

Don't promote a project on other projects' pages. Your comments will be deleted and your account may be suspended.
Be courteous and respectful. Don't harass or abuse other members.

Don't post obscene, hateful, or objectionable content. If you do we will remove it and suspend you.

Don't post copyrighted content without permission. Only post content that you have the rights to.
If you don't like a project, don't back it. No need to be a jerk.

Actions that violate these rules or our Terms of Use may lead to an account being suspended or deleted. We'd prefer not to do that, so be cool, okay? Okay.


I really love the “be cool” part.


The Kickstarter mechanism works as follows:

Step 1 is to define and submit your project to the KS staff. Projects must be closed-ended, meaning that there has to be a specific finishing point. You do this by filling out a form on the website. I received approval about one day after submitting my project. Here’s an excerpt from the email I received:

Congratulations -- you’re in! In just a moment, you’ll be able to start getting your project ready.

Take as much time as you need to prepare. There’s no deadline to launch. Check out some of our Recommended projects, browse the FAQs, and read the project guidelines. They'll give you a feel for what works and help you shape your project into a great one.

...

If you have questions, we’re here for you. Drop us a line at support@kickstarter.com.

Ready? Let’s get started!

Love,
Kickstarter


Step 2 is to set up an Amazon business account. This required making up a business name and giving tying the AB account into my regular bank account. The process was relatively straightforward.

Step 3 was to tie the Kickstarter account to the Amazon Business account. The KS page makes that process pretty straightforward as well, and in fact won’t let you proceed to the next steps until your business account is set up and confirmed, which is a good failsafe.

----

Now that I had all of the structures in place beneath me, the next step was to research and think about the critical steps involved in launching the project in a way that would be successful.

Saturday, August 27

The Kickstarter Experience Pt 1 - Overview

Earlier this summer I stepped onto a trolley near my house and was sonically transfixed. I absolutely loved how rattley and creaky everything sounded, and I made up my mind that I was going to record this thing properly.

The trolley is free to ride, so I jumped onboard with my PCM D50 and recorded a quick walkthrough. The next day I contacted the McKinney Ave Transit Authority to inquire about chartering a car for the purposes of recording it. After being quoted a decent price I decided on kickstarter as opposed to self-funding in order to make this happen.

This series of blog posts will be about my Kickstarter experience.


-----------------

I’ll begin here with the main lessons I learned and in the next parts I’ll get further into the details of each step.

I think that kickstarter IS:

an excellent way to raise funds for specific projects

I wanted to record the trolley and I didn’t want to pay for it personally. Kickstarter got that done and then some. I was truly humbled by the fact that my project fully backed in under 5 hours and funded over 500% of the initial goal.

an excellent way to collaborate on projects

I was amazed and the quantity and quality of people that took on the highest level of backing. Getting feedback and advice in a public forum made this an interesting and collaborative project. Getting further feedback in the future will only make this experience that much better.

very well designed and professional looking and feeling

There aren’t any font or formatting options on any of the communications or on the page because the KS website really just takes control of all of that and dictates the look. In the end that works out well, as the kickstarter communications all conform to a clean and consistent look that identifies with the KS brand and tends to lend credibility. All movies, photos and sounds uploaded as parts of updates or the main page are re-encoded and formatted by the KS website and embedded into its own proprietary player. Fortunately that player is very functional and works well on mobile devices.

an interesting and strange social experiement

It is the strangest thing ever to have that goal and that money line up there as the primary visual on the home page. Once you cross that goal line everyone and their dog starts spending the money you’re raising with no knowledge of ongoing expenses needed to execute the project. There are other social strangenesses that happen, but that big number is the primary driver.

relatively time-intensive, even for smaller projects

The amount of time it takes to execute a successful kickstarter is not trivial. I spent many hours scouting and prepping for the record, booking the trolleys and gear, creating the kickstarter website content, answering emails and following up on questions, doing KS updates to keep the backers in the loop, coordinating help, recording the trolleys, dumping and consolidating the data, editing the audio, metadata tagging, creating and testing the different versions of deliverables for the different backer levels, and posting and testing all of the final deliverables to the different levels with different logins.

This was a pretty straightforward recording session, but the time investment was pretty thick when all is considered.


I think that kickstarter IS NOT:

a way to make a living

As noted above the time investment is not insignificant and if I divided the “profit” taken from the final number delivered by the number of hours spent doing the work it wouldn’t add up to a very good rate.

cheap money

Kickstarter takes 5% off the top of all money earned. Then amazon takes another 5% for payment processing. This means that all backer funds come into your operations account at a 10% premium. This is a pretty significant chunk.

---------------

The caveats I’d offer to anyone planning on doing a sfx recording kickstarter are to recognize that the term “Kickstarter” is kind of a misnomer. This service is really more for dragging you across the finish line than it is for putting an idea in motion.

You have to have done your homework, prep work, and all due dilligence before launching your kickstarter if you hope to be successful.

Fundamentally, this means that you have to be able to deliver before asking backers for money. There is a lot of front end work involved in getting a project to that state. In my case that meant making sure I had clearance from the MATA people to charter a trolley for the specific purpose of mounting a bunch of mics to it and recording it, making sure that I had the equipment available, and getting reasonable assurances from the people who would help me that they were available.

It also meant that I had to have my backer levels, fundraising target, timeline and rewards all planned out and ready to go before making the pitch. Once those specific things are set and you launch the project, you can’t take it back so each is a big decision worthy of spending a little time getting right.

---------------

I greatly appreciate everyone who backed this project and I hope to hear the sounds we caught in some interesting places. If you backed this project and would like to talk about some interesting uses you’ve had for the sounds, please comment on this post. I’d love to hear it!


Thursday, August 18

truck record - this time not rained out!


First a little backstory: I needed to find a 50s model Ford F150 to match what we see on screen in the film we're working on, so my brother in law suggest a car show north of town to scout. It was a pretty small show, but lo and behold I ran into a really cool guy named Doug who just happened to be driving the exact car I needed to record. We exchanged info and two weeks later we set the date for a Saturday morning.

Of course, it rained and we moved the date to Monday after work.

By moving to a weekday we heavily compressed my recording schedule though, so I was sure to be as prepared as I could get before heading out there. Prep included:

- putting every frame of the film that included the truck on a quicktime that could be played on my ipad on location
- pre-wrapping my onboard mics with terrycloth towel for wind protection
- testing and setting up media, batteries, recorder settings, etc.

I showed up at Doug's house at around 6:30, and sunset was going to hit hard at about 8:30, so I had to work fast. I mounted the undercarriage mics with bungee cords and gaff tape, secured the boom from the back of the tailgate, and mounted the engine mic. A quick level test and we were off to find a suitable street to roll with.

No I had not scouted a street in that part of the world, but Doug knew exactly where to take us: a little gravel road with a short turn around where he could do bys and stops with little traffic intervention.

We covered the basic things we needed (mostly slow bys on gravel, slow bys on clean pavement, and some gravely tire work) and we were already starting to lose light. We did some stop n go driving so that I could catch interiors with the VP-88, and headed back.

When we arrived back at the house I pulled and re-set all of the mics for foley. The bungee cords really made that work go quickly though, because a couple of yanks and all of my mics were loose and free.

Door foley setup was VP-88 inside, Schoeps outside near, and mkh60 outside far.

We also did some glove compartment moves, and by that time we were completely dark outside and working by flashlight. Also, in summertime in Texas the cicadas come out around dusk. Out in the country the coyotes decided to announce their presence as well. I pressed on, getting what I could get and knowing that I'd have to edit a fair amount later on.

When I got back into the studio on Tuesday I opened it all up and found myself very happy with the results. The truck got just over 3 minutes of total screen time in the film and I had the entire thing cut in and sounding good by the end of the day, which was just a joy to get done.

Here's what I learned:

--Proper drafing makes all the difference in the world--

Each time I record a vehicle I get better at finding good drafting spots quickly, and this record really worked out well with regards to wind noise. Axels are great spots for mounting and drafting, but just hanging the blimp from the tailgate in the jetstream really worked out well too. I'm sure it didn't hurt that we really didn't get above 40mph, but this was truly my first vehicle record where wind noise was a complete nonfactor in all mics.

--put your best mic on the exhaust--

I made a conscious decision to get that schoeps mic in the best spot I could find for the exhaust note and it paid off in spades. I took a risk by using an unknown miking technique (at least to me) by hanging it in the blimp, but in my mixed onboard sound that mic is almost all of what I went with. man that thing sounds good.

--brighter and less true mics work well as detail spots for engine and tires--

NT5 on the tire for the gravel sound worked out really well. I wasn't relying on that mic for my exhaust note, so I was free to put it in a spot where I could get some nice crispyness from the gravel with that spot. Ditto the SM81 in the engine. While the engine does have some interesting midrange stuff going on, its mostly a much brighter sound than the exhaust and the 81 choice and placement ended up working out very well in that application.

--it doesn't take 100 mics to get a good sound--

I knew that I'd be running this record solo, so instead of bringing the 788t and a giant collection of mics to mount onto the truck, I ran the 744t and just the 4 mics. in the end, I'm more happy with the sound I got from this setup than from some others where I put much more effort and many more mics onboard. Each record teaches me more and more, and the biggest thing I learned in this one is that I really need to have those "money" mics locked down and rocking, then I'm good.

So, without further adieu here are some results and samples. enjoy!

truck onboard mix sample by Rcoronado
truck doors by Rcoronado